

How to Hide Dash Cam Wires in Your Car: A Professional 2026 Installation Guide
Bleat
A visible power cable is more than an eyesore; it's a failed installation that compromises your vehicle's safety systems. You deserve a cockpit that reflects the advanced technology of your Bleat 4K car dashcamera, not a tangled mess of plastic and copper. If you're struggling with how to hide dash cam wires in car without snapping fragile trim clips or obstructing your view, you're in the right place.
We understand the frustration of dangling wires and the anxiety of interfering with side-curtain airbags, especially as 2026 safety standards become more stringent. This professional guide promises to help you master the art of the invisible installation, delivering a secure, factory-finish look that preserves your car's integrity. You'll learn expert-level wire-tucking techniques, safe routing paths through the A-pillar, and how to utilize modern OBD-II power connections for a seamless, battery-safe setup.
Key Takeaways
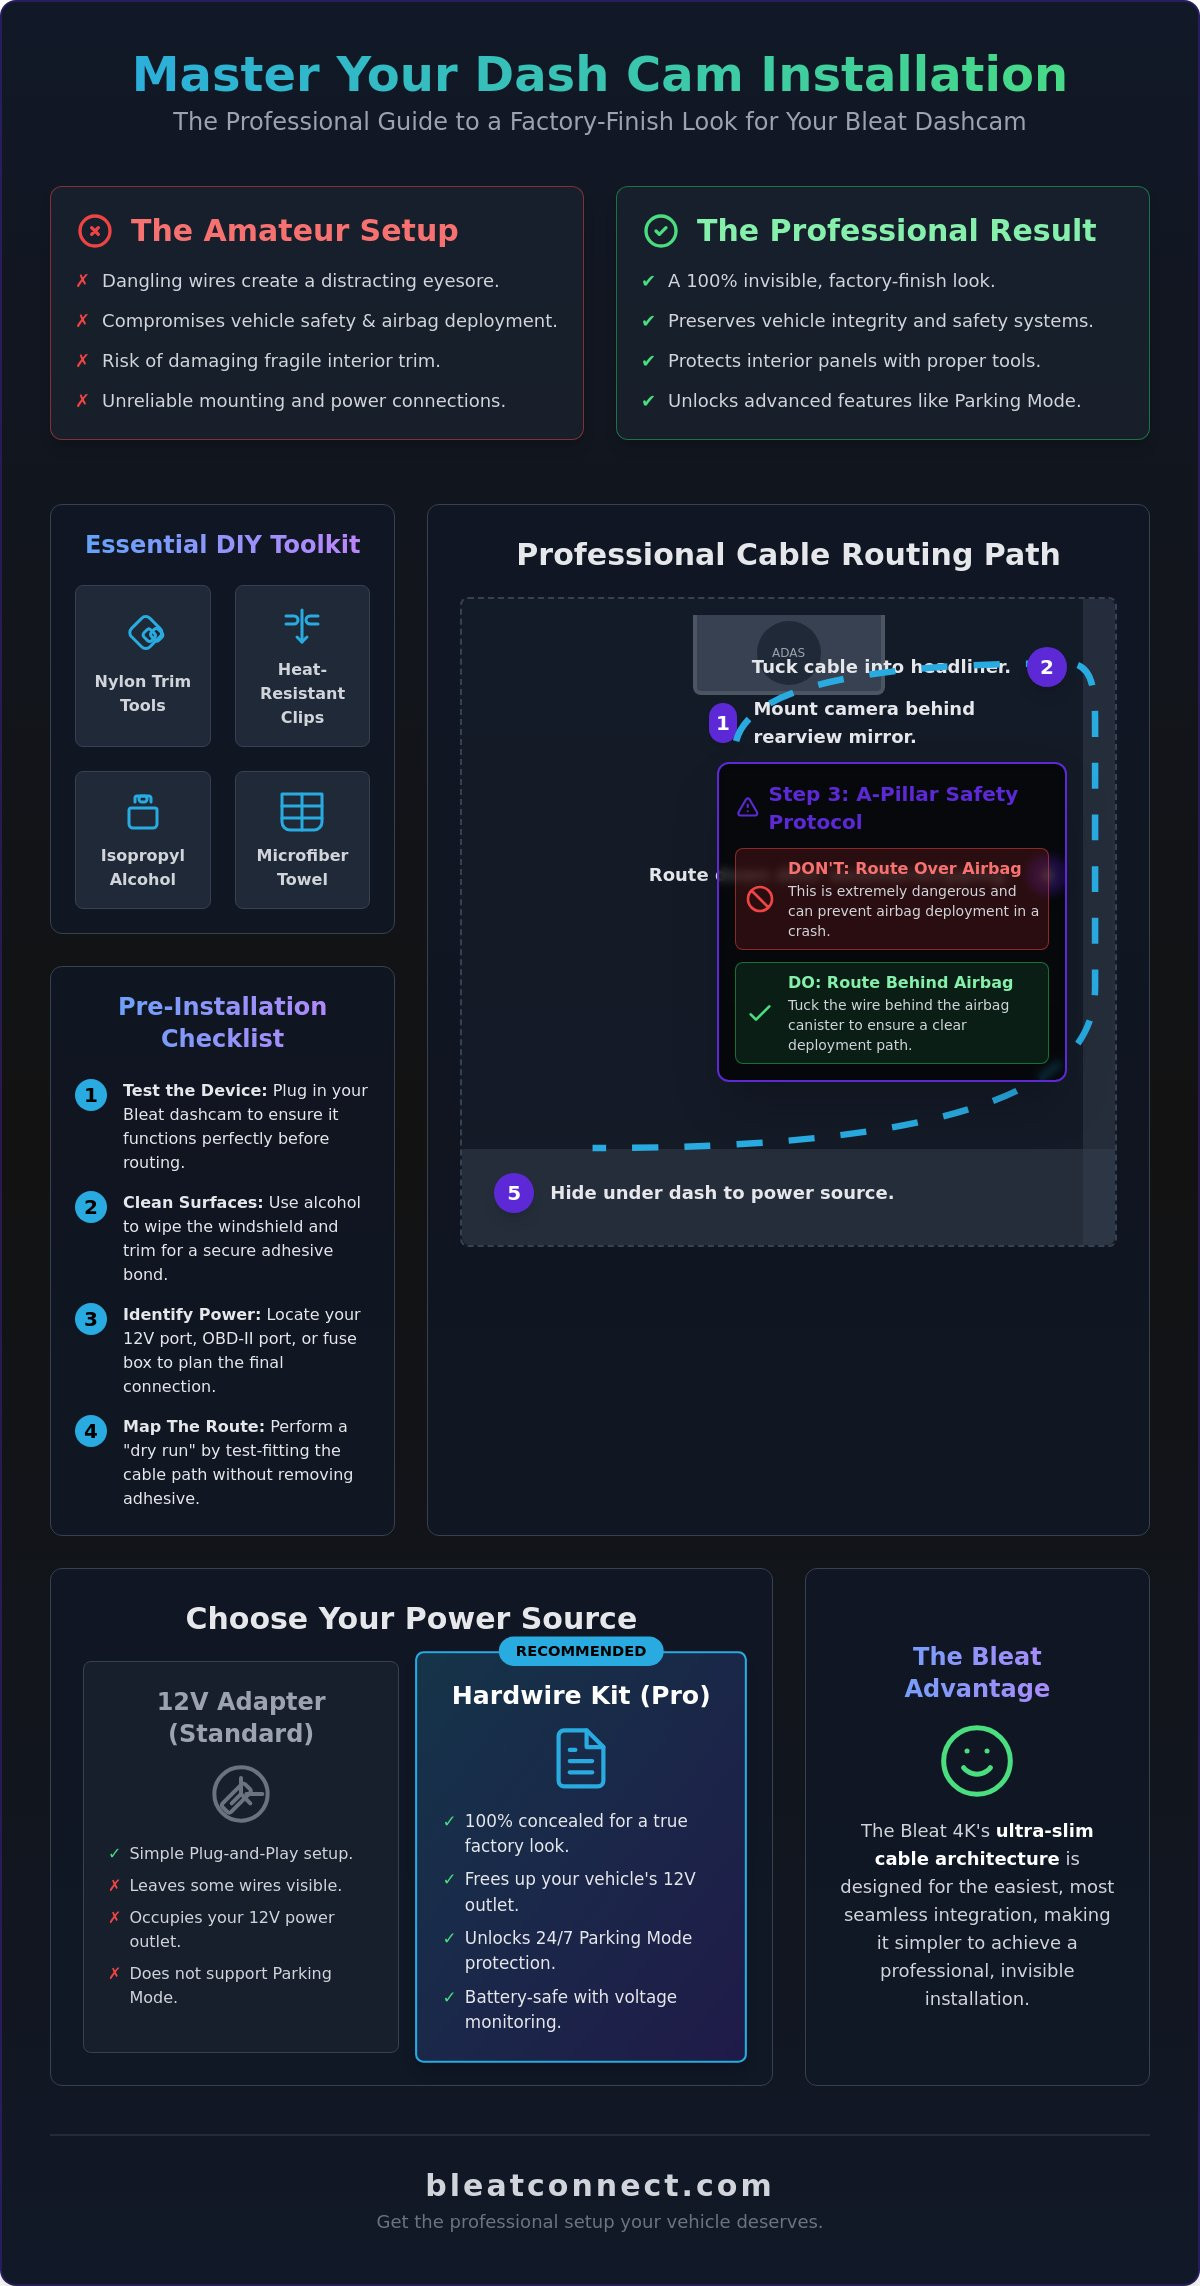
- Utilize professional trim removal tools and heat-resistant adhesive clips to protect delicate 2026 vehicle interiors during setup.
- Master the precise techniques of how to hide dash cam wires in car using the Headliner Tuck method for a sag-free, invisible finish.
- Ensure critical vehicle safety by routing all hardware cables behind side-curtain airbag canisters rather than over the deployment path.
- Evaluate the advantages of hardwiring kits to unlock advanced features like 24/7 parking mode and a fully concealed power connection.
- Leverage the ultra-slim cable architecture of the Bleat 4K dashcamera to achieve a seamless, high-tech integration behind your rearview mirror.
Essential Tools and Preparation for a Clean Dash Cam Setup
Achieving a factory-finish look starts long before you touch the adhesive. Modern 2026 vehicle interiors feature tighter tolerances and more delicate electronic sensors than ever before. If you want to know how to hide dash cam wires in car like a professional, you must abandon the credit card method. Professional nylon trim removal tools are non-negotiable. These tools allow you to pry panels without scratching the soft-touch plastics or snapping the fragile retention clips that hold your car together.
Temperature resilience is the most overlooked factor in cable management. Standard plastic clips often warp or lose their grip when cabin temperatures spike. This is why selecting heat-resistant adhesive clips is critical, especially for high-performance units like the Bleat 4K car dashcamera. These specialized clips use automotive-grade adhesives designed to withstand direct sunlight and extreme heat, ensuring your wires stay tucked even in tropical climates. Use a microfiber towel to protect your dashboard from marring during the process. Even a small slip with a tool can leave a permanent mark on premium synthetic leather.
Preparation also involves chemical cleaning. Dust and interior protectants prevent adhesives from bonding correctly. A quick wipe with 70% isopropyl alcohol on both the glass and the plastic trim ensures a permanent mount. This foundation is essential for a Dashcam setup that won't vibrate or fall off during a collision.
The Professional DIY Toolkit
Your toolkit defines the quality of your result. Avoid metal screwdrivers at all costs; they'll gouge your panels and potentially short-circuit hidden electronics. Every professional setup should include nylon trim tools for safe prying, isopropyl alcohol for surface prep, and heat-resistant cable ties to secure excess slack behind the dashboard. Always perform a dry test-fit. Hold your Bleat 4K in position and map the route before removing any adhesive backing. This ensures your cables reach their destination without tension or unsightly bulges.
Pre-Installation Checklist
Don't waste time routing a dead wire. Verify your Bleat 4K or Bleat 3K car dashcamera functions perfectly by plugging it into the 12V port before you begin. Check the live feed on your smartphone to confirm the 4K signal remains crisp and uninterrupted. Identify your power source early. Most 2026 models favor OBD-II ports for plug-and-play ease, but you should also locate your fuse box if you plan on a traditional hardwire install. Mapping the path early prevents you from discovering a blocked pillar halfway through the job.
Step-by-Step Guide: Routing Your Dash Cam Cables Like a Pro
Precision routing is the difference between a messy DIY job and a professional-grade installation. Start at the source by mounting your Bleat 4K car dashcamera behind the rearview mirror. This position offers an unobstructed field of view while keeping the device largely invisible from the driver's seat. Once the camera is secure, the challenge of how to hide dash cam wires in car begins. You'll need to work from the camera toward your power source, ensuring every inch of cable is under tension and properly seated.
The transition points are where most installations fail. Competitors often suggest simply shoving wires into the weatherstripping, but this leads to unsightly bulges where the headliner meets the A-pillar. To avoid this, use your nylon pry tool to create a consistent gap. Secure the cable with a heat-resistant adhesive clip right at the corner of the windshield. This creates a fixed anchor point that prevents the wire from sagging over time or vibrating against the glass. Following these professional steps ensures your installation meets the highest standards for Dash Cams and Vehicle Safety by keeping your line of sight completely clear.
The Upper Cabin: Headliners and Rear-View Mirrors
Guide the wire along the top edge of the windshield using your pry tool to lift the headliner material. If your vehicle features bulky rain sensors or advanced driver assistance system (ADAS) housings, don't force the wire underneath. Instead, route the cable around the plastic trim, using small adhesive clips to maintain a tight profile. This prevents interference with sensitive electronics while keeping the wire hidden from view. A secure first anchor point here is essential to stop annoying cable rattles during your commute.
Down the Side: Weatherstripping and Floor Mats
Peel back the rubber weatherstripping along the door frame just enough to slot the cable into the metal channel. Don't deform the rubber; it needs to maintain a weather-tight seal. For the final run to the power source, you have two professional options. Routing behind the glovebox offers the cleanest finish, but running the wire under the edge of the center console or beneath the floor mats is a faster alternative for plug-and-play setups. If you want a device designed for this level of discreet integration, the Bleat 4K car dashcamera features ultra-slim cabling to make these tight transitions even easier.
Navigating A-Pillars and Airbags: Critical Safety Protocols
Safety is the primary objective of any Bleat 4K installation. While achieving a clean look is important, your vehicle's safety systems must remain uncompromised. In 2023, California recorded 4,407 traffic-related fatalities, a stark reminder that safety technology like side-curtain airbags must function perfectly during an impact. Learning how to hide dash cam wires in car requires a deep understanding of vehicle safety architecture. Most amateur installers simply tuck the wire into the edge of the A-pillar trim. This is a dangerous mistake. If the side-curtain airbag deploys, a wire routed over the airbag canister can become a high-speed projectile or prevent the bag from protecting the passenger.
The golden rule for professional cable architecture is simple: the wire must always go behind the airbag. By routing the cable along the metal frame of the A-pillar and securing it to the existing factory wiring loom, you ensure the 'Path of Deployment' remains clear. This meticulous approach guarantees that your Bleat 3K or 4K dashcamera provides protection without creating new hazards. This is the only acceptable method for how to hide dash cam wires in car while maintaining the integrity of your safety systems.
A-Pillar Disassembly 101
Modern 2026 vehicle pillars often hide a retention screw behind a small plastic tab labeled 'Airbag'. Carefully pop this tab with your nylon tool to access the bolt. Once the screw is removed, apply firm, even pressure to release the internal clips. Avoid jerky movements that could snap the plastic. Always disconnect the vehicle battery before working near airbag sensors or explosive charges to prevent accidental deployment. This proactive step ensures your tech-forward upgrade doesn't result in an expensive trip to the dealer for sensor recalibration.
Cable Management Behind the Pillar
Once the trim is removed, you will see the white or silver airbag canister and the factory wiring harness. Use heat-resistant zip-ties to anchor your dash cam power cable directly to the factory harness. Ensure there is zero slack that could interfere with the airbag's mechanical movement. This method utilizes the vehicle's original engineering to keep your cables silent and secure. Finally, align the trim clips and press the pillar cover back into place until you hear a definitive click. A flush, rattle-free finish is the signature of a professional Bleat installation.
Powering Your Device: Cigarette Lighter vs. Hardwiring Kits
Choosing the right power source determines the final aesthetic and functionality of your setup. The 12V cigarette lighter method is the fastest path to protection, but it often leaves an adapter visible in the center console. If your goal is to learn how to hide dash cam wires in car for a completely invisible finish, hardwiring is the superior choice. Hardwiring connects your Bleat 4K car dashcamera directly to the vehicle's fuse box, freeing up your cabin ports and enabling advanced security features like 24/7 parking surveillance.
Understanding your vehicle's electrical map is essential for a safe, professional installation. A 'switched' power source only provides electricity when the ignition is on. A 'constant' source remains active even when the engine is off. To utilize the full potential of your Bleat hardware, you must tap into a constant fuse for parking mode. Always use a circuit tester to verify these ports before making a connection. Improperly grounded wires are a common cause of electronic interference; find a solid, unpainted chassis bolt to secure your ground wire for maximum stability.
The 12V Port Method: Quick and Clean
Even with a 12V adapter, you can maintain a clean look with strategic cable architecture. Route the cable through the side of the center console and tuck the bulky adapter into the glovebox or a hidden storage bin if your vehicle design allows. Use 'daisy-chain' loops secured with heat-resistant zip-ties to manage excess cable length. This prevents the wire from sagging into the footwell or interfering with passenger legroom, keeping the cockpit professional and safe.
Hardwiring for the Advanced User
Hardwiring requires an 'Add-a-Circuit' tap to ensure your dash cam remains on its own dedicated, fused line. This prevents any risk of overloading existing vehicle systems or compromising the car's primary electronics. Modern hardwire kits include sophisticated voltage cutoff settings. These sensors automatically disconnect the dash cam if the car battery drops below a specific threshold, such as 11.8V, to ensure your vehicle always starts. Check your vehicle's warranty guidelines before modifying the fuse box, as some manufacturers have specific requirements for aftermarket electronic integration.
Ready to secure your vehicle with the latest in surveillance technology? Upgrade to the Bleat 4K car dashcamera for a system designed for seamless, professional integration.
Achieving a Factory-Finish Look with the Bleat 4K Dashcam
Modern 4K dash cams often demand thick, cumbersome cables to handle high-bandwidth video data. These bulky wires make the task of how to hide dash cam wires in car a nightmare for perfectionists who value a clean interior. Bleat solves this engineering hurdle with proprietary ultra-slim 4K cables. These cables feature high-density shielding to protect signal integrity without the physical bulk of generic alternatives. This advanced design allows you to slide wires into the tightest trim gaps where competitors' cables would cause unappealing bulges or panel misalignment.
The Bleat 4K car dashcamera utilizes a high-performance Sony STARVIS 2 sensor to deliver elite low-light performance. To maintain this 4K clarity during high-speed data transfers to the Bleat mobile app, your cable routing must be precise. Avoid sharp 90-degree kinks during the tucking process, as extreme bends can strain the internal copper and lead to signal degradation. Utilizing Bleat-certified hardware for your 24/7 parking surveillance ensures that the power delivery remains consistent and safe, protecting your vehicle's digital well-being while you are away.
With the Indian dash cam market projected to reach USD 482 million by 2032, the demand for professional-grade DIY installations is surging. Achieving that factory-finish look is about more than just aesthetics; it's about the long-term reliability of your safety ecosystem. A properly concealed wire is protected from UV damage and accidental snags, ensuring your Bleat 3K or 4K dashcamera is always ready to record when it matters most.
Stealth Mounting Strategies
Strategic placement is the final step in your professional installation journey. Position the lens just below or behind the rearview mirror, ensuring it avoids the 'black dot' matrix found on many windshields. This matrix can interfere with the adhesive's bond and obscure the sensor's field of view. In regions like California, regulations require specific placement to avoid obstructing the driver's view, such as the rearview mirror area or specific corners of the windshield. If your model uses an external GPS module, hide it on the flat surface behind the mirror housing for a clean, professional dashboard profile. Upgrade your vehicle security with the Bleat 4K Dashcam.
Long-Term Maintenance of Hidden Wires
A professional installation requires a quick follow-up. After a week of driving, listen for 'ticking' or vibration sounds. This usually indicates a cable has shifted behind a plastic panel and requires an additional zip-tie or adhesive clip. Extreme cabin heat can occasionally cause the headliner tuck to loosen if the initial tension wasn't sufficient. Bleat's durable casing and cable jackets are engineered to withstand the rigors of diverse road conditions, providing a lifetime of reliable surveillance. Periodically verify that your wire-tucking remains secure to maintain your invisible, high-tech cockpit. This proactive maintenance ensures your how to hide dash cam wires in car project remains a permanent success.
Elevate Your Cabin with Professional Cable Architecture
Mastering the technique of how to hide dash cam wires in car transforms a standard safety device into a seamless part of your vehicle's high-tech ecosystem. By prioritizing critical safety protocols like behind-the-airbag routing and utilizing professional-grade nylon tools, you've ensured your installation is both beautiful and functional. A factory-finish look isn't just about aesthetics; it's about the absolute reliability of your surveillance tech when every second counts. You've successfully navigated the complexities of 2026 vehicle interiors to achieve a result that matches the precision of your hardware.
Experience the next level of road safety with India's trusted tech-forward dashcam brand. Our hardware is engineered with ultra-high 4K resolution and proprietary sensor integration. It's designed for a DIY-friendly installation that doesn't compromise on professional standards. Secure your journey with the market-leading Bleat 4K Dashcam. Your cockpit is now a high-tech fortress. Drive with confidence knowing your protection is invisible, secure, and always ready for the road ahead.
Professional Installation FAQs
Is it legal to hide dash cam wires in my car?
Hiding wires is perfectly legal and actually improves safety by removing visual obstructions. In regions like California, strict placement rules exist to ensure the driver's field of vision remains clear. Tucking cables into the trim helps you stay compliant with local regulations while maintaining a clean, distraction-free environment for your daily commute.
Will hiding wires myself void my car's warranty?
Routine wire tucking won't void your vehicle's factory warranty. The Magnuson-Moss Warranty Act generally protects consumers unless the manufacturer can prove your installation caused a specific electrical failure. If you are concerned about hardwiring, use a plug-and-play OBD-II power cable for a non-invasive connection that leaves no permanent trace on the vehicle's systems.
Can I hide dash cam wires without removing any panels?
You can achieve a discreet look without full panel removal by using a nylon pry tool to tuck cables into the headliner and weatherstripping. This is the most popular method for how to hide dash cam wires in car among DIY enthusiasts. However, for vehicles with side-curtain airbags, loosening the A-pillar is the only way to ensure the cable sits safely behind the deployment zone.
What should I do if the dash cam wire is too short to reach the power outlet?
Invest in a high-speed USB extension cable if your initial run falls short. Ensure the cable is shielded to maintain the integrity of the 4K signal from your Bleat camera. Avoid using cheap, unbranded extensions that might cause power drops or prevent your device from entering parking mode correctly due to insufficient voltage.
How do I hide the rear-facing camera wire in a hatchback or SUV?
Routing for hatchbacks requires threading the cable through the flexible rubber conduit or "bellows" between the chassis and the hatch door. This keeps the wire completely hidden and protects it from water ingress. Use a small amount of silicone lubricant to help the cable slide through the tight rubber sleeve without tearing the material.
Can hidden wires cause a fire or electrical short in the car?
Hidden wires are safe as long as they aren't pinched by moving parts or exposed to sharp metal edges. Always use the provided fuses in your Bleat hardwire kit to protect the circuit from overcurrent. Proper cable management prevents the insulation from wearing down over time, which is the primary cause of electrical shorts in aftermarket electronics.
Is it better to run the wire through the driver's side or passenger's side?
The passenger side is the superior choice for most installations. It provides easier access to the glovebox for cable storage and keeps the wiring away from the driver's footwell. This prevents any risk of the cable dropping down and interfering with the brake or accelerator pedals while you are driving.
How do I stop hidden wires from rattling inside the dashboard?
Stop annoying rattles by wrapping sections of the cable in automotive fleece tape or securing them firmly with zip-ties. Anchoring your how to hide dash cam wires in car project to the vehicle's original wiring harness prevents the cable from vibrating against plastic trim. This attention to detail is what separates a basic DIY job from a professional, factory-quality finish.