

Complete Front and Rear Dash Cam Installation Guide (2026 Edition)
Bleat
Your high-end 4K dash cam is practically useless if a messy installation leaves wires dangling or drains your car battery overnight. Most drivers want the total security of a dual-channel system but dread the complexity of the fuse box or the sight of cables tucked poorly into the headliner. It's a common frustration. You invested in premium technology to protect your journey, so you shouldn't have to settle for a cluttered dashboard or a dead battery. This front and rear dash cam installation guide provides the blueprint for a professional-grade, stealth setup that ensures reliable 24/7 surveillance without compromising your vehicle's sleek interior.
Achieving a factory-finish look requires more than just adhesive tape; it demands a strategic approach to power management and cable routing. Whether you're setting up a Bleat 4k car dashcamera or a 3k model, the goal is total vehicle protection with zero visible footprint. We'll walk you through identifying the right fuse taps, navigating the latest 2026 windshield regulations like California's SB 506, and securing crystal clear footage from both ends of your car. By the end of this guide, you'll have a fully integrated safety ecosystem ready for any road.
Key Takeaways
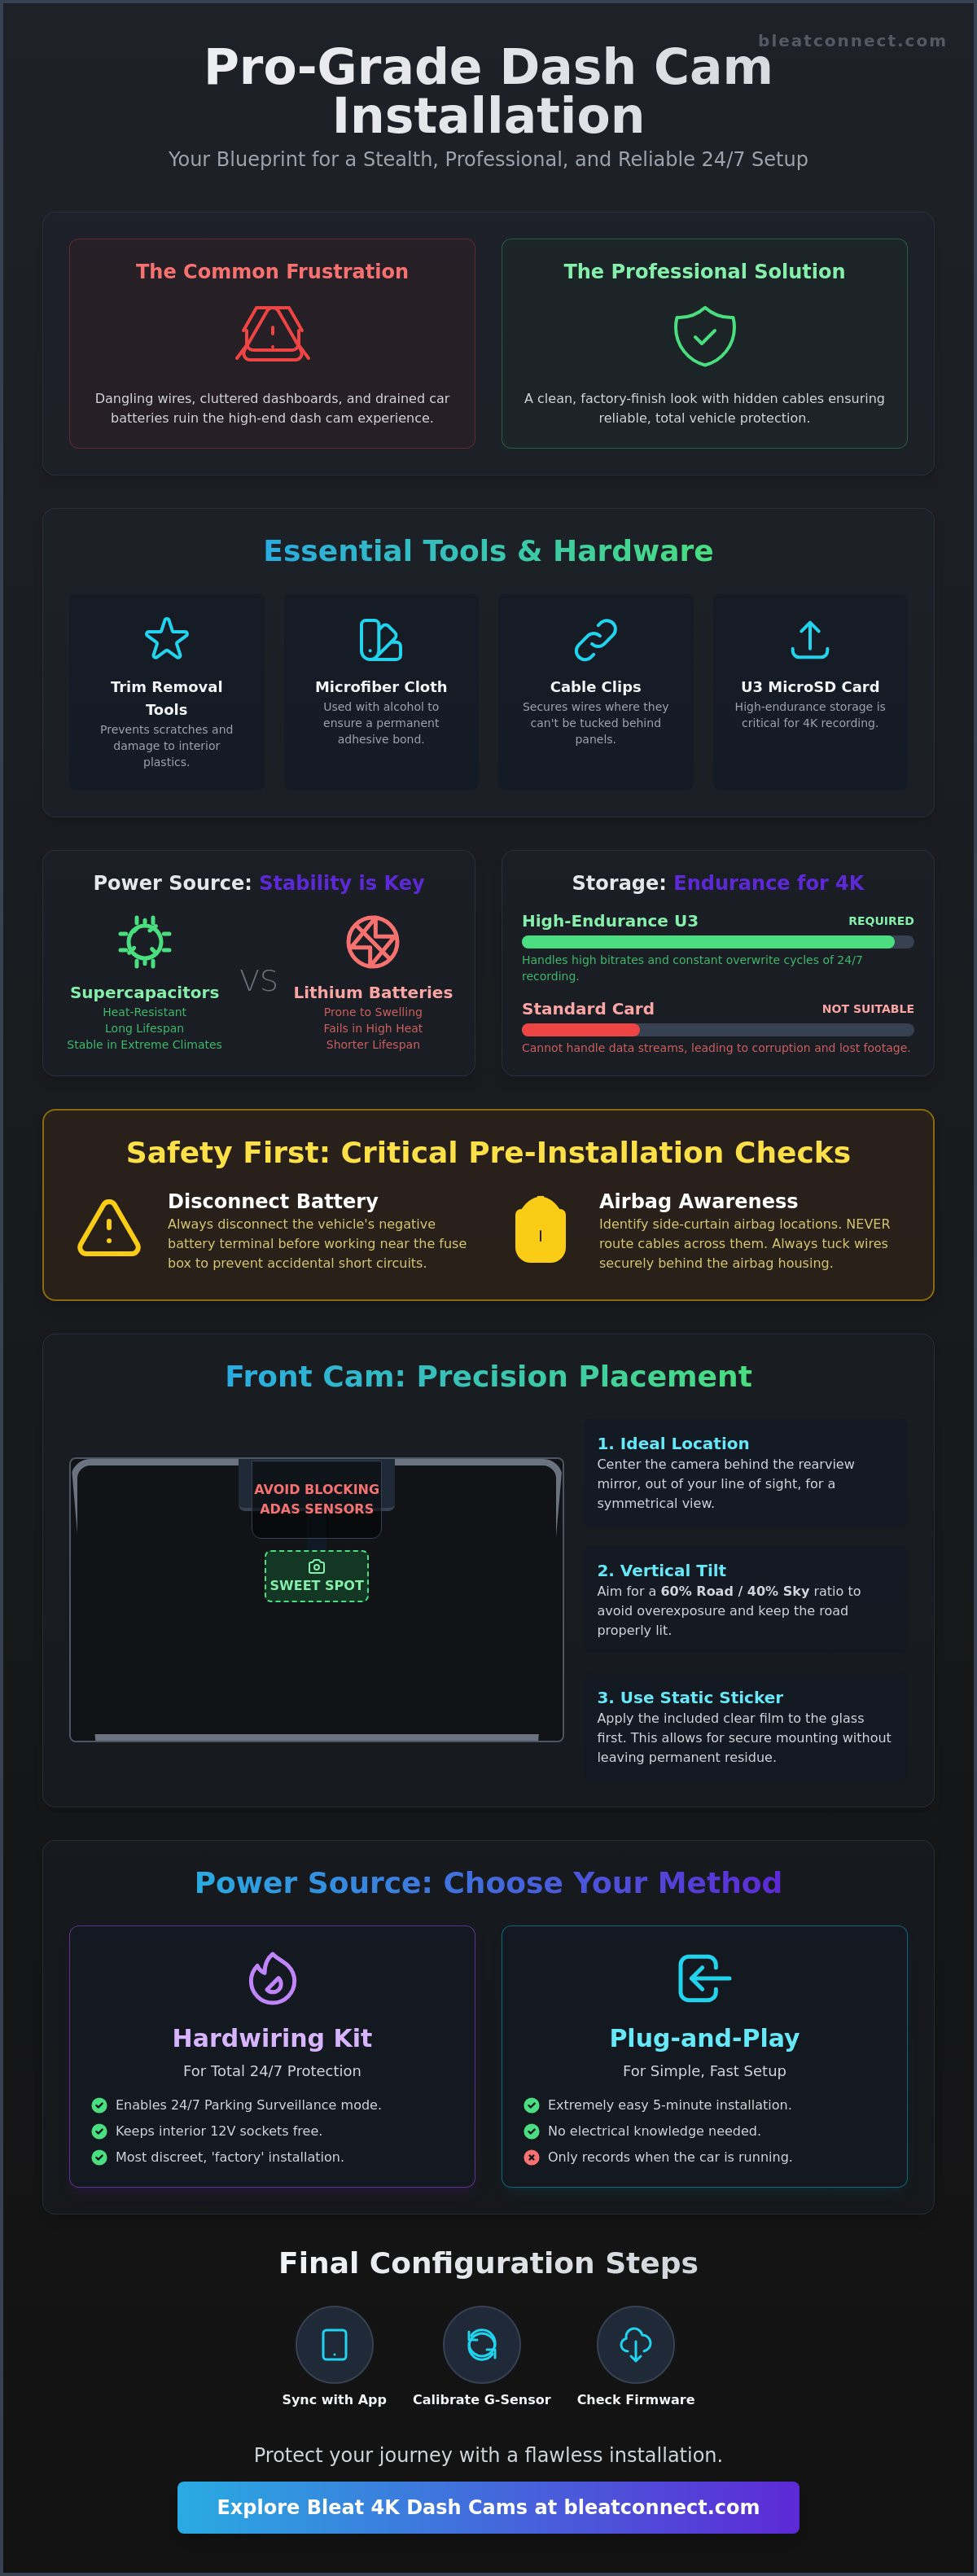
- Identify the essential hardware required for high-resolution recording, including the critical need for U3-rated high-endurance storage.
- Discover the optimal placement strategy to ensure maximum field of view while protecting the integrity of your vehicle's factory safety sensors.
- Master stealth cable routing techniques to achieve a wire-free interior and a professional, water-tight seal for rear-view cameras.
- Follow this front and rear dash cam installation guide to choose between simple plug-and-play power or hardwiring for 24/7 parking surveillance.
- Learn to calibrate your G-sensor and sync your Bleat system via smartphone for instant access to crystal clear 4K evidence.
Essential Tools and Preparation for Dual-Channel Setup
Preparation is the foundation of a professional-grade security system. Your toolkit must include plastic trim removal tools to prevent scratching modern interior plastics; metal screwdrivers will cause permanent damage to your dashboard. You'll also need microfiber cloths and isopropyl alcohol for cleaning the glass. A successful front and rear dash cam installation guide starts with hardware verification. Don't skip the pre-installation bench test. Power up your Bleat 4k car dashcamera using the provided cable and verify both front and rear feeds before you start routing wires. Testing now avoids the frustration of troubleshooting after the cables are hidden deep within your vehicle's trim.
- Trim Removal Tools: Essential for prying panels without leaving marks.
- Microfiber Cloths: Used with alcohol to ensure 3M adhesive pads bond permanently to the glass.
- Cable Clips: Helpful for securing wires in areas where they cannot be tucked behind panels.
- High-Endurance MicroSD: Crucial for the heavy data load of dual-channel 4K recording.
Dual-channel 4K systems generate massive data streams that standard microSD cards cannot handle. You need a U3-rated, high-endurance card specifically designed for video surveillance. These cards manage the high bitrates required to capture license plates clearly at high speeds and endure the constant overwrite cycles of a 24/7 system. Once your hardware is verified and your glass is prepped, you are ready to move from the bench to the car.
The 4K Advantage: Why Hardware Quality Matters
Simultaneous recording in 4K resolution puts immense strain on internal hardware. Bleat systems utilize heat-resistant supercapacitors instead of standard lithium batteries to ensure longevity. This is a critical upgrade. Standard batteries often swell or fail in parked cars exposed to direct sunlight; supercapacitors offer stable power even in extreme climates. Understanding the evolution of Dashcam technology and features helps clarify why these high-spec components are essential for total reliability. Always check for the latest firmware updates via the app before mounting to ensure you have the most recent sensor optimizations and security patches.
Safety First: Vehicle Battery and Airbag Awareness
Safety is paramount during any front and rear dash cam installation guide procedure involving the vehicle's electrical system. Disconnect your vehicle's negative battery terminal to prevent accidental short circuits while working near the fuse box. You must also identify your side-curtain airbag locations. Never route cables across an airbag deployment path. Instead, tuck wires behind the airbag housing to ensure the safety system functions correctly in an emergency. Clear the work area by removing floor mats and loosening trim panels for unobstructed access to the vehicle's wire channels.
Front Dash Cam Installation: Precision Placement
Precision mounting is the difference between a high-tech safety tool and a distracting windshield obstruction. The "sweet spot" for your primary unit is centered behind the rearview mirror. This location hides the device from your line of sight while providing a symmetrical perspective of the road ahead. You must be careful to avoid blocking factory-fitted ADAS sensors or rain sensors typically housed in the plastic casing behind the mirror. Obstructing these can disable critical safety features like lane-keep assist or automatic wipers. Before you peel the adhesive, consult the current Dash cam laws by state to ensure your placement complies with local visibility regulations. Some regions have strict limits on how much of the windshield can be covered.
Modern front and rear dash cam installation guide protocols now favor the use of a static sticker. This clear, adhesive-free film applies to the glass first, acting as a protective barrier. It allows you to mount the camera securely without leaving permanent glue residue on your windshield. If you ever need to move the unit or return a leased vehicle, the entire setup peels off cleanly. Once the sticker is in place, you can focus on the vertical tilt. Aim for a 60/40 road-to-sky ratio. This balance prevents the camera's light sensor from being "fooled" by a bright sky, which can cause the road and license plates to appear too dark.
Step-by-Step Mounting Process
Success starts with a pristine surface. Scrub the target area with isopropyl alcohol to remove every trace of oil or glass cleaner. Once dry, apply the static sticker and smooth out any air bubbles. Peel the 3M backing from the camera mount, then press and hold the bracket against the glass for 30 seconds. This pressure-sensitive adhesive requires firm contact to reach its maximum bond strength. Attach your Bleat 4K unit and use the built-in screen or the mobile app to verify the horizontal level. It's much easier to adjust the mount now than after the adhesive has fully cured.
Optimising the Field of View (FOV)
A wide field of view is essential for capturing side-impact incidents and merging traffic. Look for a 140 to 170 degree FOV to cover multiple lanes without excessive "fisheye" distortion. Ensure the edge of your car's hood is just visible at the bottom of the frame to provide a point of reference for distance. If you notice significant dashboard glare in your footage, consider adding a Circular Polarizing Lens (CPL) filter. These filters eliminate reflections from the windshield, ensuring your video remains crisp. Experience the peak of optical clarity with the Bleat 4k car dashcamera, designed for seamless integration behind any modern mirror.
Rear Camera Integration: Mastering Stealth Cable Routing
Achieving a factory-finish look requires a strategic cable path from the windshield to the rear glass. This is the most labor-intensive phase of any front and rear dash cam installation guide. You'll start by tucking the long interconnect cable into the headliner at the front, then moving toward the rear of the vehicle. Use your plastic trim tools to gently pry the edges of the A, B, and C pillars. Don't just shove the wire into the gap; ensure it sits deep enough to avoid popping out during temperature fluctuations. For hatchbacks and SUVs, the challenge is the moving trunk door. You must route the cable through the existing rubber grommets or conduits that house the factory wiring. This ensures a water-tight seal and protects the cable from being pinched when the hatch closes.
- A-Pillar: Route behind the plastic trim, ensuring you don't obstruct the clips.
- B and C Pillars: Cross the top of the door frames, staying tucked behind the weatherstripping.
- Rubber Grommets: Use a bit of silicone lubricant or soapy water to help the cable slide through tight rubber tubes.
- Orientation Check: Verify the "Top" marking on the rear camera before sticking it to the glass to avoid upside-down footage.
Crossing the Cabin: Safe Routing Techniques
Passenger safety is non-negotiable. Most modern vehicles are equipped with side-curtain airbags that run along the roofline. You must route your cables behind these airbags, never across them. If a cable is draped over an airbag, it could snap or become a projectile during deployment. Pull back the rubber weatherstripping to see the airbag canister, then secure your cable to the existing factory wiring looms using adhesive clips. Always leave a "service loop" or a small amount of slack at the hinge point of a hatchback. This extra inch of cable prevents the connection from being yanked out when the trunk is fully extended.
Mounting the Rear Unit
Center the rear camera on the upper portion of the back glass. You must avoid placing the lens directly over the orange defroster lines, as these can cause focus issues or visual artifacts in your 4K feed. Once mounted, connect the 2.5mm or USB-C link to the front unit and check the live feed on your Bleat 4K car dashcamera. Adjust the lens to capture a clear view of tailgaters and the area immediately behind your bumper. This positioning is vital for providing definitive evidence in rear-end collision claims. A secure, level mount ensures your security system remains a silent, reliable protector for every mile.
Hardwiring vs. Plug-and-Play: Choosing Your Power Source
Choosing the right energy source is the most critical decision in this front and rear dash cam installation guide. Your choice determines whether your camera is a simple drive-time recorder or a 24/7 security sentinel. The 12V cigarette lighter adapter is the easiest "plug-and-play" method. It's perfect for daily drivers who only need coverage while the engine is running. However, this method usually cuts power the moment you park, leaving your vehicle vulnerable to hit-and-runs or vandalism in parking lots. For total protection, hardwiring is the professional standard.
Hardwire kits unlock advanced features like G-sensor triggers and time-lapse parking surveillance. These kits connect directly to your vehicle's fuse box, identifying two distinct power paths. The Constant (BAT+) fuse provides power even when the ignition is off; the Switched (ACC) fuse only activates when you start the car. High-performance dual-channel 4K systems demand a stable, high-amperage power supply to manage the heavy data processing of two simultaneous video streams. Bleat hardwire kits include an integrated voltage cut-off. This smart feature monitors your car battery and automatically shuts down the camera if the voltage drops below a safe threshold, ensuring you're never left with a dead battery in the morning.
The Hardwiring Process Explained
Success requires a simple circuit tester to probe the fuse box. You'll need to find a fuse that remains live when the keys are removed for your Constant line. Once identified, secure the ground wire to a bare metal bolt on the vehicle's chassis; paint or plastic will prevent a solid electrical connection. This creates a clean, closed loop for the system. Hide the excess power cable under the dashboard using zip ties to prevent interference with your pedals or steering column. Secure your vehicle's future by upgrading to the Bleat 4k car dashcamera for elite parking surveillance.
OBD-II Power: The Modern Alternative
If the fuse box feels too invasive, the OBD-II port offers a sophisticated middle ground. Most vehicles manufactured after 1996 feature this port, which provides constant power without the need for fuse taps or wire crimping. It's a rapid installation that maintains a high level of stealth. While OBD-II adapters are incredibly fast to set up, ensure your specific vehicle model doesn't use the port for proprietary telematics that could conflict with the camera's power draw. This method delivers the same 24/7 surveillance benefits as hardwiring but with significantly less manual labor.
Configuration and Calibration: Optimising Your Bleat System
Physical installation is only half the battle. To truly master this front and rear dash cam installation guide, you must calibrate the software to match your driving environment. Start by syncing your unit with the Bleat App. This interface allows you to manage high-bitrate 4K footage directly from your smartphone. It eliminates the need to pull the SD card for routine checks. Within the app, you can fine-tune the G-sensor sensitivity. We recommend a "Medium" setting for most drivers. If it's set too high, every speed bump or pothole will trigger an emergency file lock. This quickly fills your storage with protected data that won't auto-overwrite. If it's too low, the camera might fail to secure footage during a minor side-swipe.
Loop recording intervals are another critical setting for data management. While options range from one to five minutes, 3-minute clips are the industry standard for dual-channel 4K systems. This duration provides the perfect balance between manageable file sizes and ease of searching through your video history. For those who hardwired their system in the previous step, activating Parking Mode is essential. You can choose between Time-Lapse, which captures a low-frame-rate constant stream, or Impact Detection, which remains dormant until the G-sensor feels a jolt. Impact Detection is superior for preserving car battery health during long-term storage.
Initial Software Setup
Your first digital task is formatting the microSD card within the camera's own menu. Never format the card on a PC first; the camera needs to establish its proprietary file structure for maximum recording stability. Next, enable GPS auto-sync to ensure your time, date, and speed stamps are always accurate. This is vital for legal evidence. Be strategic with audio recording. While recording cabin sound provides context, 12 states, including California, Florida, and Illinois, require all-party consent for audio recording. If you frequently carry passengers, check local regulations before enabling the microphone to ensure you remain compliant with privacy laws.
Final Testing and Maintenance
Verification is the final step in your journey. Perform a "slap test" by firmly tapping the windshield near the mount to ensure the G-sensor triggers an "Emergency Lock" notification. Review the footage from both the front and rear lenses on your phone. Look for vibrations or blur that might indicate a loose mount or a cable interfering with the lens field of view. Consistent maintenance, such as wiping the lenses with a microfiber cloth every two weeks, keeps your 4K feed sharp and reliable. Protect your journey with the Bleat 4K Dashcam today and drive with the confidence of total vehicle surveillance.
Secure Your Journey with Professional-Grade Integration
Mastering the setup of your vehicle's security system is the ultimate upgrade for the modern traveler. This front and rear dash cam installation guide has provided the technical blueprint for achieving a stealth, factory-finish look while unlocking 24/7 parking surveillance. By prioritizing strategic cable routing and precise sensor calibration, you've ensured that your vehicle remains a protected digital ecosystem. You now possess the knowledge to maintain a high-performance system that captures every detail, from license plates to side-impact incidents, without the clutter of visible wires.
Elite protection requires elite hardware. Experience the absolute clarity of 4K Ultra HD resolution powered by industry-leading Sony Starvis sensors. Our systems utilize superior supercapacitor technology to withstand extreme temperatures, ensuring your data is safe even in the harshest climates. With seamless mobile app integration, your footage is always just a tap away. It's time to elevate your road safety to global standards of excellence. Upgrade to the Bleat 4K Dual-Channel Dashcam for Total Protection and drive with the authoritative confidence that comes from owning the best in class. Your smarter, safer journey starts now.
Frequently Asked Questions
Will installing a dash cam void my car warranty?
Installing a dash cam won't void your vehicle warranty in most cases. Under the Magnuson-Moss Warranty Act, manufacturers can't deny a warranty claim unless they prove the aftermarket accessory directly caused the failure. Use a fuse tap for hardwiring instead of cutting factory wires to maintain the integrity of your electrical system. This approach ensures your high-tech upgrade remains a safe, non-invasive addition to your vehicle.
How long can a dash cam record in 24/7 parking mode before the battery dies?
Most systems record for 12 to 48 hours depending on your car battery's capacity and health. Bleat hardwire kits include an integrated voltage cutoff to prevent a dead battery. The system automatically shuts down once your battery hits a safe threshold, such as 11.8V or 12V. This smart power management ensures you always have enough energy to start your engine while maintaining constant surveillance.
Can I install a front and rear dash cam myself, or do I need a professional?
You can absolutely perform a DIY installation using this front and rear dash cam installation guide. Most drivers achieve a professional, stealth look in about 60 to 90 minutes with basic trim removal tools. While some owners of complex luxury vehicles prefer a professional, the hardwire and plug-and-play methods are designed for accessible, high-tech self-integration.
What is the best SD card for a 4K dual-channel dash cam?
You must use a U3-rated high-endurance microSD card specifically designed for continuous video overwriting. Standard cards fail quickly under the heavy data load of 4K dual-channel recording. Look for cards labeled for video surveillance or dash cam use. These are built to withstand extreme heat and the constant read-write cycles required for reliable evidence capture in a high-resolution ecosystem.
How do I hide the cables if my car has side-curtain airbags?
Safety is the priority when routing cables near side-curtain airbags. You should tuck the wires behind the airbag canister, securing them to the factory wiring looms with adhesive clips. Never drape a cable across the deployment path. This ensures the airbag functions correctly during an emergency while maintaining a clean, wire-free interior aesthetic that doesn't compromise passenger safety.
Does the rear camera record through tinted windows?
Yes, rear cameras record effectively through tinted windows, though extremely dark tints might slightly reduce night vision clarity. High-performance sensors like those in the Bleat 4k car dashcamera are engineered to compensate for lower light levels. Ensure the lens is pressed close to the glass to minimize reflections and maximize the clarity of your 4K rear feed.
What happens when the SD card is full?
Modern dash cams use loop recording to ensure you never stop capturing the road. Once the SD card reaches capacity, the system automatically overwrites the oldest unprotected files with new footage. Any video triggered by the G-sensor or manually locked by the user is stored in a separate, protected folder. This ensures your most critical evidence is never deleted by the loop cycle.
How do I view the footage on my phone?
You can access your footage instantly through the dedicated Bleat mobile app. The camera creates a secure local Wi-Fi hotspot that connects directly to your smartphone. This allows you to download, review, and share 4K clips without ever removing the microSD card. It's the fastest way to provide evidence to law enforcement or insurance providers at the scene of an incident.